#inline style in html
Explore tagged Tumblr posts
Visit Tumblr Blog
Explore Tumblr blogs with no restrictions, modern design and the best experience.
Last Seen Tumblr Blogs


Fun Fact
Mobile US users spent an average of 115.8 minutes on Tumblr app monthly.
Photo
External CSS and how to use it https://shores.dev/external-css-and-how-to-use-it/?utm_source=tumblr&utm_medium=social&utm_campaign=ReviveOldPost
2 notes
·
View notes
Text
A quick example of the current state of Goblin:
I imported my following list from mastodon and started following everyone with my goblin.band account too, so I basically read all my mastodon content from there already. Even if no one but me using the tumblr-like features I'm adding, I already enjoy Goblin more than Mastodon.
Things that I've added since my last post:
Integration with mastodon (and well, any other fediverse platform that use plain text instead of html)
Copy/pasting images in the editor
Sanitized html input when saving & updating posts
Improved the landing page
Cleaned the menus and improved the UI in general
Current "next" to-do list:
Fix posts displaying images twice when you paste an image
Fix RSS feed including the inline files again after the post
Sanitize html inputs on incoming federated posts
fix several style issues around different settings sections (black texts on dark blue background, white text over white background, etc)
Figure out if I can create a tumblr-api app so the posts from goblin can be automatically shared here without having to go through Zappier.
Figure out what kind of server I need to run a, let's say, 500 people server.
Find someone to do some security review of my server (Long story short, I've only a very slim idea of what I'm doing when configuring a server and I'm sure I've left some huge security holes around).
This is happening, folks. I think Goblin is going to be a reality. At least https://goblin.band will be.
305 notes
·
View notes
Text
I’ve been brewing a little magic and ended up crafting three profile codes with the same base layout, each dressed in a different color theme. They're simple, clean, and (dare I say?) kinda enchanting.
Heads up though: the images I used are randomly plucked from the internet while I was sneakily coding during work hours (oops). So please make sure to download and reupload them yourself, then swap the image URLs in the code. Otherwise, things might break later when the images vanish into the void – and nobody needs that kind of heartbreak.
The real beauty of these layouts? They’re powered by CSS variables. At the top of the CSS under :root, you’ll find all the main color settings. Want a new vibe? Just change a few hex codes, and the entire theme transforms. No messy inline styles, no chaos – just clean, manageable code. The HTML is kept as minimal as possible for easier editing and a smoother experience.
♥ Fantasia #1 (Video Theme)
♥ Fantasia #2 (Red Version)
♥ Fantasia #3 (Blue Version)
Have fun customizing, enchanting, and nerding out. And if you end up using it pls show some love, reblog, or drop a comment. ♥ ♥ ♥
22 notes
·
View notes
Text
I'm very powerful and everyone loves me. And you shuold go look at my wikipedia copy skin on toyhouse.
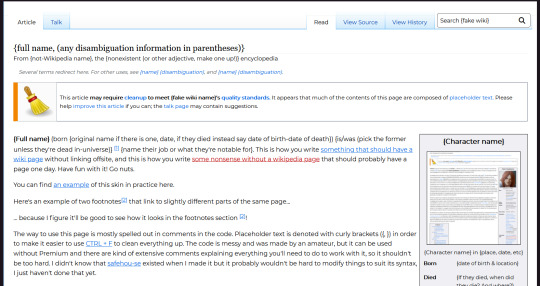
I'm genuinely really proud of this because I learned how to do a good 80% of it completely on the fly. It is the reason I'm about to fail my elective for the semester though, because I was way more enthused to learn all manner of HTML and CSS inline styling tricks than I was to do my assignments.
But like look upon my power. Gaze and weep or whatever that ozymandias guy said.

It's even passable on mobile.
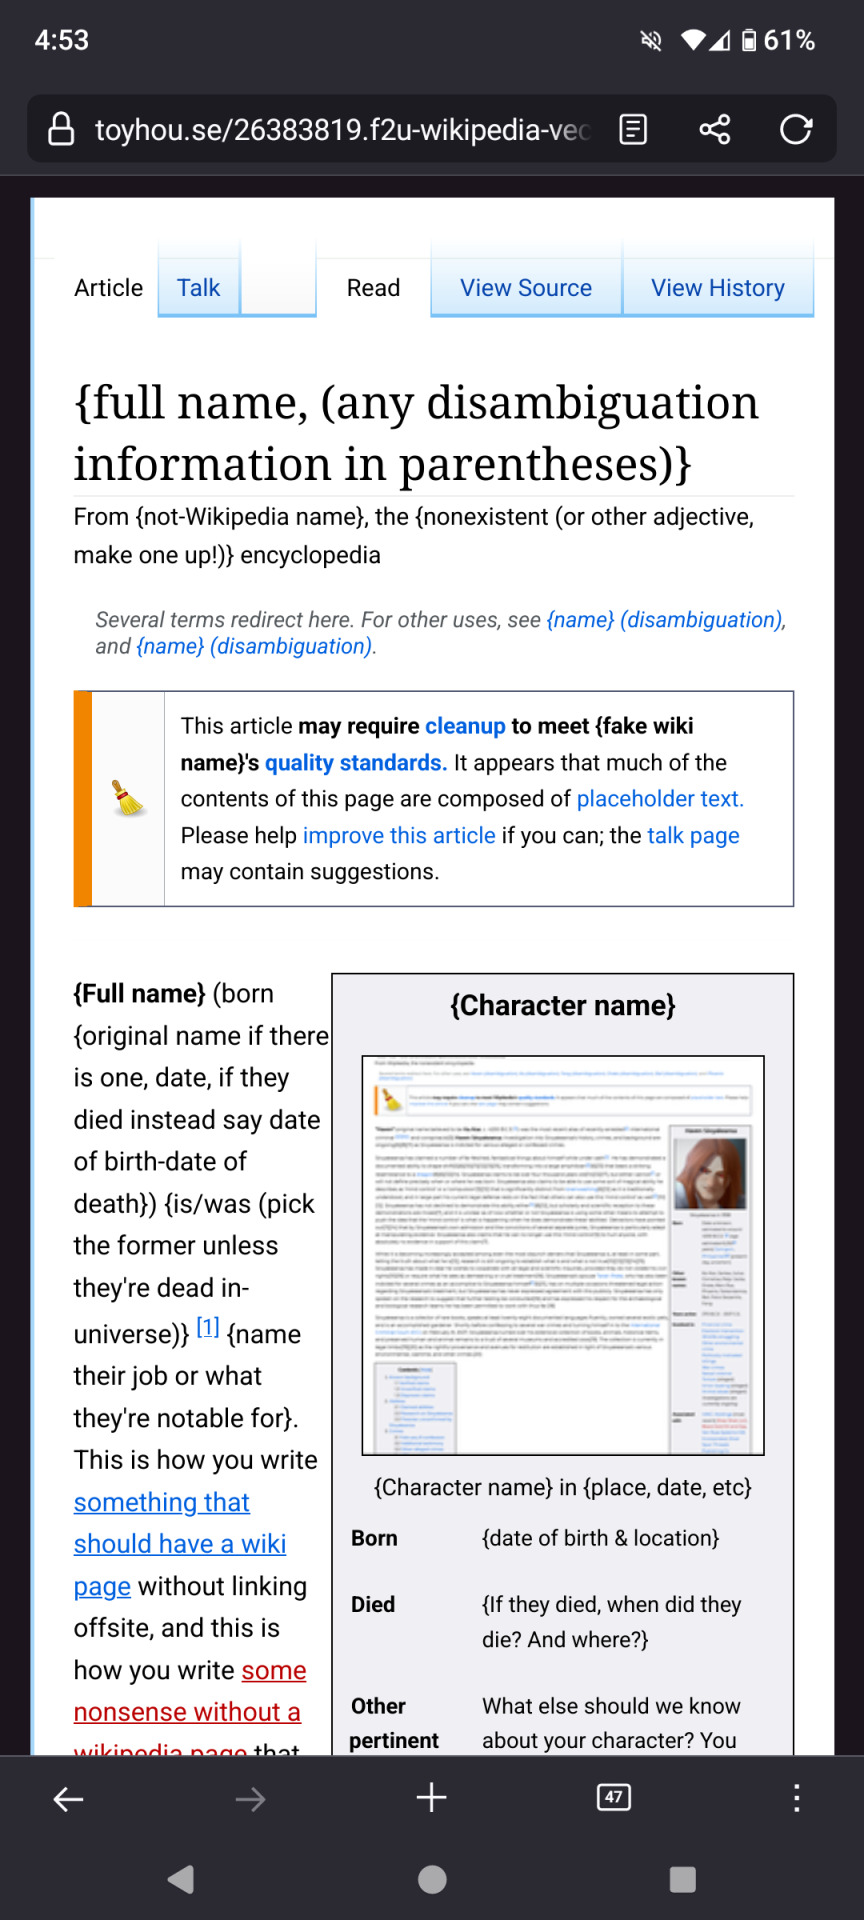
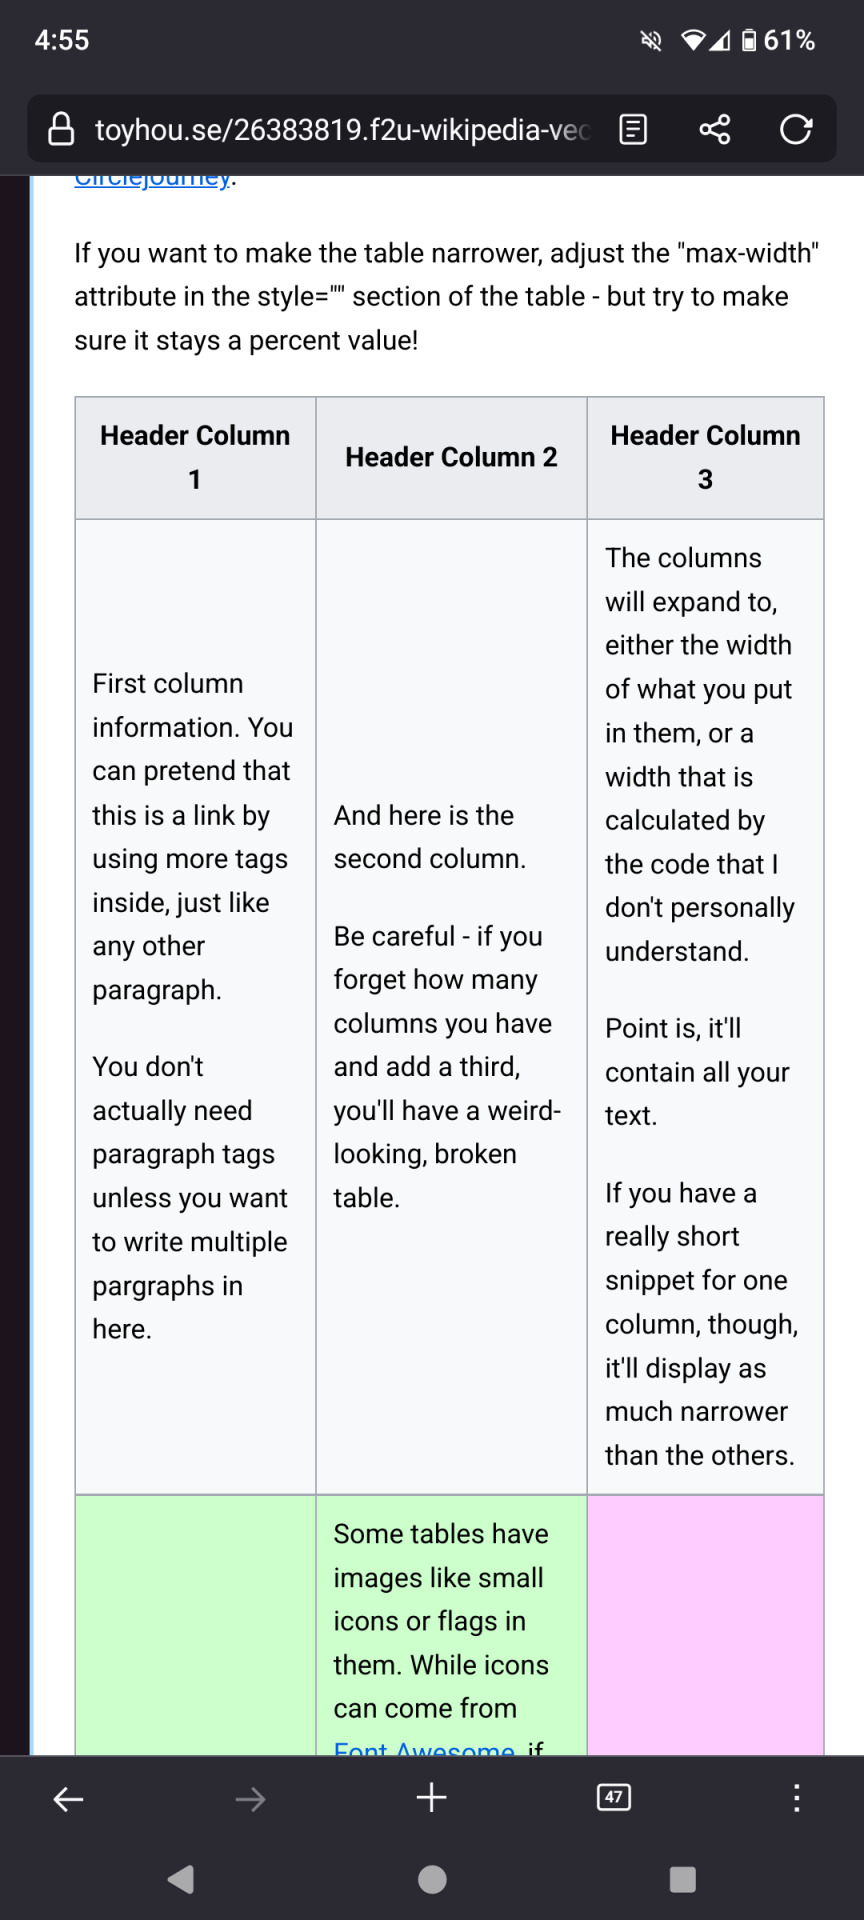
I am mightier than god.
You want to look at my skin so bad.
41 notes
·
View notes
Text
differences ive noticed between tumblr and cohost so far:
tumblr has numbers, like most social media sites, for almost every aspect of it. notifications, likes, reblogs, comments, followers, following, etc. cohost only had numbers for notifications (opt-in) and number of comments. the rest had nothing indicating a number, not even for the original poster.
tumblr has notifications for many actions, including "<person> liked a post you shared" and others. it seems you can turn them off but the fact tumblr has them in the first place is concerning. cohost, by design, had very limited notification scope. when someone rechosted your chost with added text, you only got one notification: that someone rechosted it. you won't know the likes and rechosts of it. you also didn't get mention notifications.
tumblr also offers push notifications on their mobile app, while cohost never offered notifications (and was purely a web app that could masquerade as a mobile app).
tumblr's ask system (which cohost's was based off of) is a LOT more robust. private ask answers, the option to allow media in your received asks, etc. the only leg-up cohost seemed to have was the option to allow for asks from logged-out accounts. cohost also allowed for media in asks until the feature was abused and it was globally turned off.
cohost's post format had an unstyled title that could be up to 240* characters long, and a post body that could be styled however you want. tumblr does not seem to have this title system, other than the "biggest" text style option.
cohost never had an algorithm for showing you chosts. it was reverse chronological only. the only system they had for a global feed is the #The Cohost Global Feed tag, and it was still only reverse chronological. tumblr has a For You page, with recommended posts that your mutuals liked or have many notes, but it seems to have a Following feed that's reverse chronological as well?
cohost had mostly unrestricted html and css (as long as it was inline)* as well as some basic markdown support. tumblr seems to just have a few fonts, some colors, and pretty much the same range of basic text styling.
cohost was very sex positive and allowed pretty much all porn with exceptions for csam and other illegal material. (18+ content needed to be tagged as such). tumblr, as of 2017ish (iirc?) does not allow for pornorgraphic content of any kind.
cohost's four staff members were queer as fuck and the atmosphere of cohost was EXTREMELY queer. tumblr has seemingly had multiple instances of bans of trans users for seemingly no reason other than "they were trans".
cohost had a cool mascot while tumblr seemingly doesn't have any. eggbug win
as someone who used cohost a ton before it shut down, moved to bluesky, and is now dipping their toes into tumblr, i think cohost did it better than tumblr on a lot of fronts, even if its features weren't as fleshed out. i'll do a full retrospective piece about cohost another time though
anyways shoutout to tumblr sending one of my bullet points to the void when i was changing the formatting. very cool
and if you used cohost as well, let me know what i missed!! i'll edit this post if so :3
14 notes
·
View notes
Note
Hiya! I found your blog through your neocities website! I was wondering if there’s any tips or things you read/watched that help you make your site. (Im heavily considering making one of my own neocities site it just seems fun)
hihi welcome !! i have quite a few pieces of advice, but the tldr is you should come up with an idea for what you want to make beforehand, and look up how to do each piece! your knowledge will start to fill in along the way :]
(this is probably gonna be long as hell so under the cut is all of the fun stuff /silly)
the way i personally started off was by sketching out what i wanted my site to look like! if you know what you want before you begin, you'll know where to look to figure out what you need to do. html+ css are extremely easy languages to read/write once you know what to look for!
^ this was the original sketch for my site, where i planned out everything i wanted to include. it's a bit different from what actually ended up on the site, but that's alright! it's just about having an outline to work from. i think of it like outlining before you write, it feels like such a pain in the ass because u just wanna start working NOW but u will thank yourself later for taking the time to plan.
once you know what you want to make, start looking for tutorials and resources to make it easier! the grid for my homepage and some of my other subpages was made using a css grid generator, since its one of the more confusing bits of css. you can make grids without it, but its a very easy way to make a more asymmetrical design if ur using the generator!
thats linked here, it gives you some css to put in your head or css sheet, and then the html for the different boxes to slap in your main document. it can be easier to understand what itll look like if you give each one a border while you work, even if its just temporary!
when looking for information about css and html, w3schools is your best friend. its a pretty comprehensive database of every little piece of html + css you could ever need, with examples you can play with yourself to understand what each variable does! it's been a lifesaver for me, ive watched basically zero video tutorials because everything on there is explained so well and you can find basically Anything.
they even have code snippets for things that take more than one or two lines of code, which you can use and adapt yourself! (the tooltips on the official art + my art sections on the hinata shrine were adapted from a tutorial on there!)
in general, having a plan and working from there will make ur life so much easier. the pages that ive sketched out beforehand or ive had a very clear vision for have been WAYY easier to code than the ones i tried to come up with on the fly, and ive been much happier with how they've turned out as well. though i do also have some smaller, rapidfire tips as well that ill go thru now!!
— inline css (the style="" tag) seems so so useful but really should only be used when you're resizing images like buttons. when u keep all of your css in the head or in a seperate document, its way easier to debug and read later. i cleaned up my homepage recently by removing all of the inline css and looking at the code stresses me out WAY less because i can actually read it LOLOL ... plus cutting the css out and putting it in its own document made me realize that id accidentally wrote some really weird code in some places
— this is very much 'do as i say, not as i do,' but use an external editor (like visual studio code) instead of editing live on neocities! you can set up a live preview, and generally wont be pushing out 100 updates every single time you change or add something. i tend to code directly on neocities but its a bad habit and i want to break it eventually v_v
— if you really like an effect someone else has on their site, you can peek using inspect element i promise the coding police won't get you !! dont steal code line for line, but you can figure out what theyre doing and put your own spin on it. things like border images can be really cool, and i only figured out about them because i looked at what someone else was doing and figured out how to adapt it for my own site! check linkbooks and credit sections as well, a lot of people will include links to any effect they didnt make themself or got help with. (including me! the credits section of the linkbook has a ton of little things i got from other places, including a really neat little music player, the rss feed for my status cafe, and the wobbly text on the homepage!)
— most stuff in html and css basically just... says what it does in the tag. so looking stuff up for it is extremely easy! if you've used carrd before you honestly probably already know more abt html than u'd think just intuitively. when ur adjusting the margins or padding in carrd, you're adjusting the margin: and padding: properties in the css of the website it's outputting!
this is getting way too long but!! my best advice is to just get started. you'll never be able to learn without trying, and it genuinely is so fun to have something that's truly your own!
(if u have any specific questions im happy to answer anytime as well! i love talking abt neocities, its a super fun hobby and way easier to pick up than u would think!)
#originals.txt#inbox.txt#neocities.zip#god im so sorry abt how long this is i havent had time to work on the site for a while and its getting to my head /silly
6 notes
·
View notes
Text
So I know how to code websites now, but idk how to upload it to the internet. My plan is to give you all a post that will update with a string of code to sort of visit the website(s?) that I am curating. I will reblog a post that had the original, and include a more patched version as time goes on. I am so sorry in advance.
Because of this.... Lemme show you how html and css works!!
For Project Our Realities, it will all be in html and css since that's what I'm learning so far. JavaScript will be included later.
HTML and CSS basics below!!
HTML, or Hyper-Text Markup Language is the basics of coding a website. It describes how a website will look. It unfortunately doesn't get you too far in terms of digital design, which is why we have languages like Css and javascript.
All HTML files start with <!DOCTYPE html>. This declares to the file that you will be coding in html rather than something like lua.
Each HTML file, after declaring it as an html file, starts with <HTML> and </HTML>. To end a tag, you must close it by adding a forward slash before writing its name (unless it is <br> or <hr>, or similar).
The <head> tag lets you add a title (silly little tab name), a favicon (silly little icon next to the name of the tab) and ways to link your CSS to the HTML.
An HTML file will look like this <!DOCTYPE html>
<html>
<head>
</head>
<body>
</body>
</html>
In the body, you can write the rest of your page, using headers (<h>/<h1-6>), paragraphs (<p>), and even forms (<form>).
--
CSS, also known as Cascading Style Sheets, is a type of coding language that is often used to create websites. No, it is not C++.
Rather than <>, CSS uses brackets {} to code.
CSS is used to style html websites, so it addresses html tags and lets you style their appearance. There is something known as inline CSS, where you can use the <style> tag to style something in your HTML file. HTML was never meant to have colors in its code, but you can change the color of text with inline css. Let's say you would like to style a header.
In your HTML file, it would say:
<!DOCTYPE html>
<html>
<head>
<link rel="stylesheet" href="(name of .css file goes here)">
</head>
<body>
<h1> My first header!!! :> </h1>
</body>
</html>
Now that we have our header, let's turn it red.
In your CSS file, it should say...
h1 {
color: red;
}
The H1 addresses that it will select all h1 elements. The code in the brackets shows that all those addressed will be the color red.
CSS has no starting or finishing lines, all elements will by stylized with {}.
--
To create an HTML file, you must end it with .HTML
To create a CSS file, you must end it with .css
Sometimes, when I create a link for the Css, the required name for the file will be in the HTML code already. Make sure that both files are in the same folder, and not one in a different folder within the same parent folder. This will not work.
--
Wanna test this out? Make a new notepad file on Windows, title it as "firsthtml.html", and create another file called "firstcss.css".
Place this in the .HTML file: <!DOCTYPE html>
<html>
<head>
<title> First HTML </title> <link rel="icon" type="image/x-icon" href="https://i.pinimg.com/736x/1a/8d/9d/1a8d9d26cdca15285d217c817f6953ec.jpg">
<link rel="stylesheet" href="firstcss.css">
</head>
<body> <h1>Welcome, traveler!!</h1>
<h3><I>Thank you for reading the tutorial!! Follow the blog to keep up with our news.</I><h3>
</body>
</html>
Now, for your .css file, write this down:
h1 {
color: dark blue;
}
h3 {
color: orange;
}
--
Thank you so much for following this tutorial. I mainly learned about this from w3schools and in my school course. Happy coding!!! :>
-ava
#.io#ava#ava our realities#io our realities#eps foundation#entertainment productions studio#project our realities#our realities#coding#html#HTML stuff#css#Css stuff#hyper text markup language#cascading style sheets#there will be more coding to come#I hope this helps you guys get into coding
3 notes
·
View notes
Text
Deadline: June 30, 2024 Payment: $15 Theme: Speculative fiction, primarily horror, science fiction, and fantasy. Note: Reprints welcome Formatting Guidelines This is proving to be a recurring problem, so we're putting it up front. Please, for all our sakes, read this next part carefully. All submissions should be sent by e-mail (no letters or telephone calls please) to [email protected]. Below are some formatting rules to help us process your submission more quickly. EMAIL AND COVER LETTERS Email is accepted in both text and HTML formats. When submitting, please put this in the subject line: Submission: (Title) - (First and Last name) Include the following in the body of the email and in the attached submission: Your name Name to use on the story (byline), if different Your preferred email address Your mailing address The story's title The story's word count You may also include a cover letter in the body of the email. We get a lot of strange stuff in cover letters, so if you're unsure of what goes in them (and especially what doesn't) please refer to these cover letter tips: How to write a cover letter | What not to put in a cover letter by Jed Hartman SUBMISSION FORMATTING We ONLY accept submissions as attachments! All stories submitted as an attachment must follow standard manuscript formatting. We will no longer read any story not properly formatted. (And we much prefer Courier New to Times New Roman) For explanations and tips on what SMF is and how to do it with word processing programs, please see this article. Please send your submission as an attachment in Microsoft Word (.doc, .docx) or Rich Test Format (.rtf) only. Other formats, such as Works, WordPerfect, Open Office, etc., have proven difficult to open. Please note that we no longer accept "inline" submssions; that is, submissions with the stories pasted directly into the body of the email. FICTION GUIDELINES We're looking for good, solid fiction. We specialize in the Science Fiction, Fantasy and Horror genres. We will consider other genres, such as humor or general interest, provided that the work possesses an original, "quirky" slant. Here are some basic do's and don'ts. DO give us strong characters and good plotting. DO put clever, but logical twists on the end of your tales. DO experiment with new ideas and unusual writing styles, but without falling into traps of contrivance and cliché. DON'T submit any stories based on movies, television or any printed media not your own. DON'T submit reprints without including the name of the publication in which the work first appeared, along with the date of publication. DON'T send more than one story in the same submission. There is no minimum or maximum length for fiction. But bear in mind that short-shorts (less than 500 words) and flash fiction (less than 100 words) are usually hard sells for us, as are stories longer than 5000 words. We'll consider them, but they will have to be exceptional. We pay a flat rate of $15 (U.S. dollars) for each story. Payment is made upon publication, either by PayPal or personal check, based on the author's wishes. NON-FICTION GUIDELINES We publish one or two articles an issue. The subject matter MUST involve the art or business of writing. Research, editing, characterization, narrative style, query letters, cover letters, dealing with editors, agents or publishers - virtually any topic that concerns writing is fair game. The maximum length for non-fiction is 2000 words. We pay a $15 (U.S. dollars) flat rate. Payment is made upon publication, either by PayPal or personal check, based on the author's wishes. GENERAL STUFF We publish biannually, on the first of May and November. The order in which stories and articles appear on the site is solely arbitrary and should not be construed in any other way. All works that are accepted for publication remain on the site for the full six months. With the publication of the subsequent issue, all rights to the works previously displayed revert to the author.
We buy First World Rights and World Reprint Rights. Bylines are most certainly given. Most submissions are reviewed within 6 weeks. If the story shows merit, we will respond with a "maybe" letter, explaining that the submission is in the running for a spot in the next issue. At the end of the submission cycle, which is always two months before the next issue comes out, all "maybe" submission are re-reviewed, and the top eight selected for publication. At that time, all accepted authors receive contracts to sign. Since these contracts and, later, the payment checks, go out by snail mail, it is VERY important that all submissions include a snail mail address. We don't "buy ahead". By that, we mean that ALLEGORY purchases only the stories it needs for the current issue, rather than stocking up for the next and the next. This means that every author who received an acceptance from us will see their work on this site with the next new issue, provided he or she reads, signs, and returns to us an unchanged contract. Simultaneous submissions are "OK", provided that you let us know at the time of submission that other editors are reviewing this work. That's about it. Good luck. Via: Allegory Magazine.
9 notes
·
View notes
Note
do you happen to know any site building tutorials to follow and learn from? been having a hard time finding a place to start with my own neocity but the free reign and customization of them interests me a lot :0c
ABSOLUTELY! I do want to stress one thing if HTML/CSS is something you're not familiar with: It's okay if your website doesn't look like the most creative, eye-popping thing in the world! I've seen sooooooo many people get so discouraged because their beginner websites don't look like the flashier websites you see on Neocities' front page (by people who've been coding for a Long Time, mind you!) and like!!! That's fine!!! The code of my own site was quite possibly the worst thing you've ever seen thrown together into one big CSS soup before I Literally Just Rewrote It Today, After A Year Of Having A Neocities. And so, with that being said:
As anyone on the internet might do, w3schools is the absolute first place I'd recommend to beginners! There are videos, it's mostly a text-based learning site with lots of exercises to test your knowledge. If you'd prefer videos:
My personal favorite guy on Youtube to learn coding things from is Giraffe Academy: Here's his full course on HTML! The video itself is about two hours—I skimmed through it and everything seems to be perfectly oriented towards beginners (I haven't watched it in its entirety, but I have seen his videos on C# and Python [programming languages, don't worry about it] and they did a lot to help explain certain things to me that I didn't know previously!).
BroCode's HTML in 1 hour and CSS in 1 hour are pretty good! His videos do include a little bit on how to implement some JavaScript here and there, but nothing major or terrifying.
Here's a playlist of HTML/CSS tutorials in bite-sized videos, too! Think about 10-25 minutes per video.
I will say that searching for YouTube videos on HTML/CSS will always sort of gear more towards what people in the professional sphere are looking for rather than what you'd see on Neocities.
As for Neocities-specific things (which may be the actual point of your ask! Might've misinterpreted the hell out of it oops):
sadgrl.online is perhaps the most known website on Neocities, largely because the website itself not only has a layout maker you're free to use if you want to make a website now but the thought of writing HTML/CSS from scratch terrifies you, but also HTML/CSS guides themselves! There's also a bunch of links you can use to help fluff up your site a bit, generate HTML code for you, or just fluff up your site in general.
The Melonland Project is also dedicated to providing website development tools and tutorials for beginners: here is its guide to making a website on Neocities! It also provides a link to learnlayout.com, which I'll link here as well—a website for helping you learn CSS layouts!
And, once you've got the hang of how CSS works but are still feeling unable to code it yourself (no ideas? just not feeling up to it? FUCK MAN DO I UNDERSTAND THAT) Eggramen has free CSS pages you can use, and all you have to do is write the HTML for it!
But I would always focus more on learning HTML first before any CSS—and then learning how to integrate CSS into HTML via inline styling (which those video tutorials do!) before worrying about any external stylesheets or whatever. HTML is the actual building block—CSS just makes it look pretty.
#'site-building' tutorials will almost always lead you to like. coding bootcamps and stuff for companies#the nc-specific links should be more help in just building a site on nc!#anyway. hope to god i didn't misinterpret this question HAHA#asks
12 notes
·
View notes
Photo

External CSS and how to use it https://shores.dev/external-css-and-how-to-use-it/?utm_source=tumblr&utm_medium=social&utm_campaign=ReviveOldPost
0 notes
Text
Hey, Here's something I learned for creating my tumblr bio.
So, in current times, I'm a little apprehensive to say anything too searchable in my bio such as that I'm trans. So I didn't want to use the official emoji. But I wanted the flag there for humans to see. I have very limited knowledge of html and css but I got this to work. I embedded the image data it's self into the html code. Usually images are linked, and the address is stated in the html, but that would require uploading the image somewhere and tumblr linking to it even when my not viewing it within my tumblr themed page.
So here's what I did. First I created a file in photoshop that is 8×5 pixels. I painted it with the colors of the trans flag. As tumblr limits how many characters you can put in your bio, the smaller the image the better. As the flag is the same left to right, I reduced it to 1×5 px. Then I saved it as a gif to the desktop.
I'm sure this is easy to do on a Windows or Linux computer too but on a Mac, open the Terminal app. *See alternative option below. type:
cd desktop
Then type: (include the single space at the end after txt)
base64 -i imagename.gif -o imagename.gif.txt
It'll export a file on the desktop with a code in it that looks something like this:
R0lGODlhAQAFAKIAANUtAP+aVv///9NipKMCYgAAAAAAAAAAACH/C05FVFNDQVBFMi4wAwEAAAAh+QQEAAAAACwAAAAAAQAFAAADBAghQwkAOw==
Add the image into the html with a usual:
<img src="#" alt="text" title="text"
Replace the # with this code and the image data:
data:image/png;base64,
Add the inline css to size and position it.
style="image-rendering: pixelated; height: .8em; width: 1.2em; display: inline; position: relative; top: -.15em;">
The final html code looks like this: (remove the $, its there to let you see the code without it rendering the image)
<$img src="data:image/png;base64,R0lGODlhAQAFAKIAAFvO+tewxfWpuPvd4////wAAAAAAAAAAACH/C05FVFNDQVBFMi4wAwEAAAAh+QQEAAAAACwAAAAAAQAFAAADBAhCAgkAOw==" alt="TF" title="TF" style="image-rendering: pixelated; height: .8em; width: 1.2em; display: inline; position: relative; top: -.15em;">
So that's it. It doesn't work in posts, only a tumblr bio or a webpage of your own. Let me know if it works for you and I'll try to help if you run into trouble.
BTW, tumblr only allows up to 2000 characters including spaces in your bio.
Here are some references and additional information that I used to create this.
References:
https://www.thesitewizard.com/html-tutorial/embed-images-with-data-urls.shtml
https://developer.mozilla.org/en-US/docs/Web/CSS/image-rendering
https://www.macworld.com/article/221277/command-line-navigating-files-folders-mac-terminal.html
https://www.w3schools.com/Css/css_positioning.asp
*this next one is a tool that lets you create the image code without the Terminal app.
https://www.coderstool.com/gif-to-base64
hopefully I didn't miss anything, goodluck!
1 note
·
View note
Text
having to code html without using a style sheet or a style tag and just fully relying on inline is fucking hellish toyhou.se why do you do this to me
5 notes
·
View notes
Text
Universal Scroll Button(Autochange Direction) For Any Host
Hey, do you have a site with a lot of forums? Does your host allow you to use Javascript? Boy does this weirdo have a deal for you! For the low low price of free, you can get right now access to a scroll button that swaps directions when you scroll automatically, as well as changing the target & title on hover! Act fast, this deal won't last! I kid, but enough of the ShamWowery. In reality, this is a very simple script that reads how far you have scrolled a window, & applies or removes a class to your scroll button, as well as changing the target of said scroll button & adjusting the title to reflect which way it will take you!
It's so simple, crediting me seems superfluous but if you want, feel free to credit with a link to my blog <3 I hope the new verse of our song is eminently kind to everyone!
See it In Action(Click, or look Below):
I currently use this code on two different WIPS, so feel free to check out some gifs;
To Begin
Before the end of your </body> tag in your wrappers(for Jcink) or wherever the HTML templates go on other sites, you want to place this script:
<script> $(window).scroll(function() { if ($(this).scrollTop() > 800) { $('#scroll').attr("title","To Top?").attr("href","#Top").addClass('totop'); } else { $('#scroll').attr("title", "To Bottom?").attr("href","#Bottom").removeClass('totop'); } });</script>
This seeks out an id of Scroll to adjust the href & title as needed depending on the scroll position within the relevant window. The scroll amount is in px, so to change how quickly it changes the button, alter the number 800 to whatever you desire, fiddle with it; one size never fits all.
The Styling
Once you've saved that, move to your CSS, or wherever your Style tag is to add styling for the link itself. Keep in mind the link should be contained within a container that handles its positioning for it as otherwise the script will fuck with the positioning as well as the transformation & you really just want it to spin upwards.
The styling for the link should be as follows;
#scroll { display: inline-block; positioning: relative; transform: rotate(0deg); transition: transform .5s ease-in-out; /*** ^ change the .5s to alter duration or the ease-in-out to alter the timing of the transition between button states ***/ }
#scroll.totop { transform: rotate(180deg); }
The first statement defines the default state (linking to the bottom) of the scroll button on the load of the page, the second defines the change of position once the window has been scrolled far enough to activate one's script.
The HTML
Now you've got the behaviour defined via JS & the styling defined via CSS, it's time to input the HTML, or the bone structure of the code itself. In your wrappers, template, or wherever HTML goes on your host, locate three places;
One, where you want the TOP scroll location to be. This is where the scroll button will take you once it has changed states on scrolling a certain distance. Here, you place an anchor span as follows;
<span id="Top"></span>
Two, Where you desire for the BOTTOM or BODY scroll location to be, as in where the scroll button will take you on click initially. This could also be a scroll to the start of content, in which case I recommend changing #Bottom & id="Bottom" respectively to reflect the syntax, it's entirely up to you. Here, you place an anchor span as follows;
<span id="Bottom"></span>
Finally, It's time to add the scroll button. Keep in mind, where you put it is a function of utility & design choice. Some like it persistently hovering in a fixed position, some like it in a sidebar or on userlinks, some prefer it in the navigation bar.
Wherever you place it, try to ensure that it's easily accessible on any device, screen size, & matches the User Interface logic you've used everywhere else. If you have all text buttons, don't use just an icon, if you have all icons, don't suddenly use just text. Match your action calls, so users don't feel confused while using your site.
Once you've decided where you want it, place the following code, NOTING that there should be a container for this code that positions it for you. I've provided two options; the Icon Font option (courtesy of Phosphoricons -- a free & reliable Icon Font I recommend -- As well as one which includes text, so both UI/UX design philosophies are accommodated.
Note the option with text will only rotate the caret from downwards to upwards, so the scroll text shouldn't need editing unless you want to add or supplement flavourtext.
Please choose the appropriate option for yourself;
Icon Font
<a id="scroll" class="ph-fill ph-caret-down"></a>
Icon Font with Text
<span>Scroll <a id="scroll" class="ph-fill ph-caret-down"></a>?</span>
Some Notes:
I just want to add a bit of info:
If your browser isn't scrolling smoothly to your anchors? Check your settings, & be sure the root of your CSS has scroll-behaviour: smooth; in it.
If you use this guide & have problems getting it to work, please let me know! I will troubleshoot this for you & tumblr has strange coding, I may have futzed something up, I want this to be as accessible as possible, so don't be silent; questions help!
If you are not using Jcink, or another host with a Jquery library pre-loaded, be aware that one is needed for this script to work. Most hosts will have a default Jquery library, but if yours doesn't or you're self hosting, any should do. The Jcink file is below, however, if you want to just use that.
10 notes
·
View notes
Text
Learn HTML and CSS: A Comprehensive Guide for Beginners
Introduction to HTML and CSS
HTML (HyperText Markup Language) and CSS (Cascading Style Sheets) are the core technologies for creating web pages. HTML provides the structure of the page, while CSS defines its style and layout. This guide aims to equip beginners with the essential knowledge to start building and designing web pages.
Why Learn HTML and CSS?
HTML and CSS are fundamental skills for web development. Whether you're looking to create personal websites, start a career in web development, or enhance your current skill set, understanding these technologies is crucial. They form the basis for more advanced languages and frameworks like JavaScript, React, and Angular.
Getting Started with HTML and CSS
To get started, you need a text editor and a web browser. Popular text editors include Visual Studio Code, Sublime Text, and Atom. Browsers like Google Chrome, Firefox, and Safari are excellent for viewing and testing your web pages.
Basic HTML Structure
HTML documents have a basic structure composed of various elements and tags. Here’s a simple example:
html
Copy code
<!DOCTYPE html>
<html>
<head>
<title>My First Web Page</title>
<link rel="stylesheet" type="text/css" href="styles.css">
</head>
<body>
<h1>Welcome to My Web Page</h1>
<p>This is a paragraph of text on my web page.</p>
</body>
</html>
: Declares the document type and HTML version.
: The root element of an HTML page.
: Contains meta-information about the document.
: Connects the HTML to an external CSS file.
: Contains the content of the web page.
Essential HTML Tags
HTML uses various tags to define different parts of a web page:
to : Headings of different levels.
: Paragraph of text.
: Anchor tag for hyperlinks.
: Embeds images.
: Defines divisions or sections.
: Inline container for text.
Creating Your First HTML Page
Follow these steps to create a simple HTML page:
Open your text editor.
Write the basic HTML structure as shown above.
Add a heading with the tag.
Add a paragraph with the tag.
Save the file with a .html extension (e.g., index.html).
Open the file in your web browser to view your web page.
Introduction to CSS
CSS is used to style and layout HTML elements. It can be included within the HTML file using the <style> tag or in a separate .css file linked with the <link> tag.
Basic CSS Syntax
CSS consists of selectors and declarations. Here’s an example:
css
Copy code
h1 {
color: blue;
font-size: 24px;
}
Selector (h1): Specifies the HTML element to be styled.
Declaration Block: Contains one or more declarations, each consisting of a property and a value.
Styling HTML with CSS
To style your HTML elements, you can use different selectors:
Element Selector: Styles all instances of an element.
Class Selector: Styles elements with a specific class.
ID Selector: Styles a single element with a specific ID.
Example:
html
Copy code
<!DOCTYPE html>
<html>
<head>
<title>Styled Page</title>
<link rel="stylesheet" type="text/css" href="styles.css">
</head>
<body>
<h1 class="main-heading">Hello, World!</h1>
<p id="intro">This is an introduction paragraph.</p>
</body>
</html>
In the styles.css file:
css
Copy code
.main-heading {
color: green;
text-align: center;
}
#intro {
font-size: 18px;
color: grey;
}
CSS Layout Techniques
CSS provides several layout techniques to design complex web pages:
Box Model: Defines the structure of an element’s content, padding, border, and margin.
Flexbox: A layout model for arranging items within a container, making it easier to design flexible responsive layouts.
Grid Layout: A two-dimensional layout system for more complex layouts.
Example of Flexbox:
css
Copy code
.container {
display: flex;
justify-content: space-around;
}
.item {
width: 100px;
height: 100px;
background-color: lightblue;
}
Best Practices for Writing HTML and CSS
Semantic HTML: Use HTML tags that describe their meaning clearly (e.g., , , ).
Clean Code: Indent nested elements and use comments for better readability.
Validation: Use tools like the W3C Markup Validation Service to ensure your HTML and CSS are error-free and standards-compliant.
Accessibility: Make sure your website is accessible to all users, including those with disabilities, by using proper HTML tags and attributes.
Free Resources to Learn HTML and CSS
W3Schools: Comprehensive tutorials and references.
MDN Web Docs: Detailed documentation and guides for HTML, CSS, and JavaScript.
Codecademy: Interactive courses on web development.
FreeCodeCamp: Extensive curriculum covering HTML, CSS, and more.
Khan Academy: Lessons on computer programming and web development.
FAQs about Learning HTML and CSS
Q: What is HTML and CSS? A: HTML (HyperText Markup Language) structures web pages, while CSS (Cascading Style Sheets) styles and layouts the web pages.
Q: Why should I learn HTML and CSS? A: Learning HTML and CSS is essential for creating websites, understanding web development frameworks, and progressing to more advanced programming languages.
Q: Do I need prior experience to learn HTML and CSS? A: No prior experience is required. HTML and CSS are beginner-friendly and easy to learn.
Q: How long does it take to learn HTML and CSS? A: The time varies depending on your learning pace. With consistent practice, you can grasp the basics in a few weeks.
Q: Can I create a website using only HTML and CSS? A: Yes, you can create a basic website. For more complex functionality, you'll need to learn JavaScript.
Q: What tools do I need to start learning HTML and CSS? A: You need a text editor (e.g., Visual Studio Code, Sublime Text) and a web browser (e.g., Google Chrome, Firefox).
Q: Are there free resources available to learn HTML and CSS? A: Yes, there are many free resources available online, including W3Schools, MDN Web Docs, Codecademy, FreeCodeCamp, and Khan Academy.
#how to learn html and css#html & css course#html & css tutorial#html and css#html course#html css tutorial#html learn#html learn website#learn html#learn html and css#html and css course#html and css full course#html and css online course#how to learn html and css for beginners
3 notes
·
View notes
Text
So is a CSS variable just
part of a style you can override in HTML
a value that can be referenced elsewhere in CSS
?
Like intuitively I’d like to be able to use that variable directly in inline HTML styles as well (as opposed to acquiring it on that element indirectly via e.g. some CSS class), not just set it, but I can’t find any examples of anyone doing that…I mean I guess I can do it in JS, but that feels circuitous, yk?
(I don’t have control over the CSS here except by JS manipulation, which is annoying, so “make your CSS better for your use case” is only a roundabout option here.)
EDIT: resolved! see replies :)
15 notes
·
View notes
Text
Let's understand HTML

Cover these topics to complete your HTML journey.
HTML (HyperText Markup Language) is the standard language used to create web pages. Here's a comprehensive list of key topics in HTML:
1. Basics of HTML
Introduction to HTML
HTML Document Structure
HTML Tags and Elements
HTML Attributes
HTML Comments
HTML Doctype
2. HTML Text Formatting
Headings (<h1> to <h6>)
Paragraphs (<p>)
Line Breaks (<br>)
Horizontal Lines (<hr>)
Bold Text (<b>, <strong>)
Italic Text (<i>, <em>)
Underlined Text (<u>)
Superscript (<sup>) and Subscript (<sub>)
3. HTML Links
Hyperlinks (<a>)
Target Attribute
Creating Email Links
4. HTML Lists
Ordered Lists (<ol>)
Unordered Lists (<ul>)
Description Lists (<dl>)
Nesting Lists
5. HTML Tables
Table (<table>)
Table Rows (<tr>)
Table Data (<td>)
Table Headings (<th>)
Table Caption (<caption>)
Merging Cells (rowspan, colspan)
Table Borders and Styling
6. HTML Forms
Form (<form>)
Input Types (<input>)
Text Fields (<input type="text">)
Password Fields (<input type="password">)
Radio Buttons (<input type="radio">)
Checkboxes (<input type="checkbox">)
Drop-down Lists (<select>)
Textarea (<textarea>)
Buttons (<button>, <input type="submit">)
Labels (<label>)
Form Action and Method Attributes
7. HTML Media
Images (<img>)
Image Maps
Audio (<audio>)
Video (<video>)
Embedding Media (<embed>)
Object Element (<object>)
Iframes (<iframe>)
8. HTML Semantic Elements
Header (<header>)
Footer (<footer>)
Article (<article>)
Section (<section>)
Aside (<aside>)
Nav (<nav>)
Main (<main>)
Figure (<figure>), Figcaption (<figcaption>)
9. HTML5 New Elements
Canvas (<canvas>)
SVG (<svg>)
Data Attributes
Output Element (<output>)
Progress (<progress>)
Meter (<meter>)
Details (<details>)
Summary (<summary>)
10. HTML Graphics
Scalable Vector Graphics (SVG)
Canvas
Inline SVG
Path Element
11. HTML APIs
Geolocation API
Drag and Drop API
Web Storage API (localStorage and sessionStorage)
Web Workers
History API
12. HTML Entities
Character Entities
Symbol Entities
13. HTML Meta Information
Meta Tags (<meta>)
Setting Character Set (<meta charset="UTF-8">)
Responsive Web Design Meta Tag
SEO-related Meta Tags
14. HTML Best Practices
Accessibility (ARIA roles and attributes)
Semantic HTML
SEO (Search Engine Optimization) Basics
Mobile-Friendly HTML
15. HTML Integration with CSS and JavaScript
Linking CSS (<link>, <style>)
Adding JavaScript (<script>)
Inline CSS and JavaScript
External CSS and JavaScript Files
16. Advanced HTML Concepts
HTML Templates (<template>)
Custom Data Attributes (data-*)
HTML Imports (Deprecated in favor of JavaScript modules)
Web Components
These topics cover the breadth of HTML and will give you a strong foundation for web development.
Full course link for free: https://shorturl.at/igVyr
2 notes
·
View notes